Here are four great reds that give you a lot of bang for your buck if you are a Cabernet Sauvignon lover. I am a big fan of California Cabs out of Paso Robles. They deliver a lot of flavor and fruit. There are definitely more expensive reds from that area that I love (1858, for example), but Carson Ridge and Mina Mesa are two bottles that are always a crowd pleaser. Both are great for pairing with dinner or enjoying alone. You may want to also try a great red blend out of California (Stories & Spells) and a supertuscan (St. Giorgio) if you are a Cabernet lover. Both blends are very much in the same wheelhouse as a California Cab – fruit forward with a smooth finish.
Carson Ridge, $13.99 – Cabernet Sauvignon, California (Paso Robles)
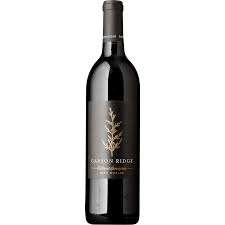
This is a very drinkable wine – it is medium-bodied and elegant. If you want to spend more a little more money, their Reserva is excellent. Pair with: Charcuterie meats and cheese
From Total Wine – “Lighter, fruit forward Cabernet with fresh strawberries & cherry notes. Subtle oak influence allows the expressive fruit to take center stage, resulting in a smooth, easy drinking red that offers great value & approachability without sacrificing character.”
Mina Mesa, $12.99 – Cabernet Sauvignon California (Paso Robles)
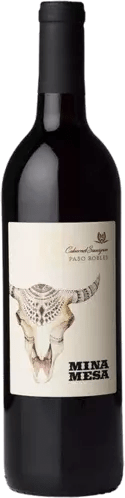
This wine has great notes of mocha, blackberry, and currant. This is a great stand alone wine, but it pairs well with: aged cheddar cheese, red meat, and Italian food.
From Total Wine – “A medium shade in the glass, this wine offers strawberry and licorice aromas on the nose. It’s an easy-drinking style on the palate, with crisp strawberry and cranberry flavors dusted in porcini and toasted wood.”
Stories & Spells, $14.99 – Red Blend, California (Paso Robles)

Definitely notes of cherry and chocolate. This one is great for a wine, cheese, and chocolate night. Pair with: Hard cheese, lamb, dark chocolate
From Total Wine – “Bewitching, shadowed notes of dusty plum, cocoa, and mulberry. Soft, supple tannins create a lush mouthfeel. Balanced fruit, with fine acid structure, and spiced oak.”
St. Georgio Toscana, $14.99 – Super Tuscan, Italy
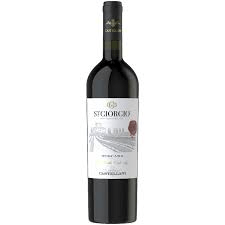
Supertuscans are blends that are essentially Chianti but not allowed to be labeled as such. They usually bring an intense fruit flavor yet are balanced and smooth. “This full bodied wine has an opulent bouquet of delicious caramelized fruits, full bodied yet balanced. Perfect for anyone looking to enhance their meal or enjoy on its own.” Notes of dark fruit and intense cherry. Pair with: Hard cheese, beef.